GIGABYTE Z87X-OC Review: Overclocking Oriented Orange at $200
by Ian Cutress on October 11, 2013 10:00 AM EST- Posted in
- Motherboards
- Intel
- Gigabyte
- Z87
GIGABYTE Z87X-OC In The Box
Over the ~3 years I have been reviewing motherboards at AnandTech, I very rarely come across a motherboard package (on the Intel side) under $250 that has not made a compromise or two in the box package. Sometimes there is a USB 3.0 bracket at this price range, but as this is an OC board so there should be some OC related paraphernalia.
In the box we get:
OC Brace (with screws)
Rear IO Shield
Manual
Driver CD
SLI Bridge
Crossfire Bridge
Four SATA Cables
V-Check Point Cables
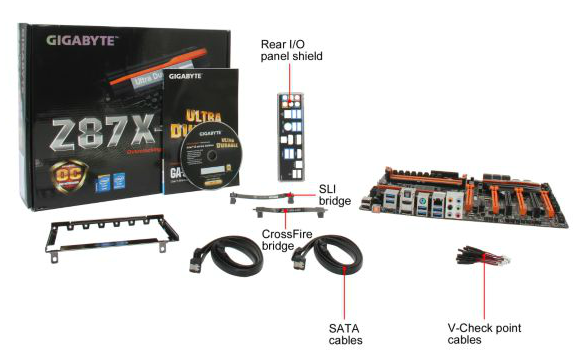
It is still nice to see a Crossfire bridge inside a motherboard box! Typically SLI is all we get, due to the different bundling policies of AMD/NVIDIA. On the OC side we see the Brace and voltage check point cables to bolster the offering, and finally a set of SATA cables.
GIGABYTE Z87X-OC Overclocking
Experience with GIGABYTE Z87X-OC
GIGABYTE overclocking is always a little odd for some reason. Despite the new graphical BIOS design, my brain prefers to go back and use the ‘classic’ mode for adjusting settings, just because of the deeper color contrast.
In terms of 24/7 stable overclocking, the OC specific additions to the Z87X-OC are more left in the BIOS and software rather than the OC Touch buttons – the point of a stable system is not one you boot into then manually adjust the frequencies. Through EasyTune, three OC modes are offered, most of which worked on our sample.
For manual overclocking, our CPU is more often the bottleneck as with other Z87 reviews – 4.6 GHz is easily achieved but too much voltage is needed to push it beyond this. At 1.4 volts the system gets too warm under our stress tests to warrant further stability testing. Nonetheless, we were able to boot at 5.1 GHz, albeit unstable, suggesting that with more voltage and the right cooling that this is possible.
Methodology:
Our standard overclocking methodology is as follows. We select the automatic overclock options and test for stability with PovRay and OCCT to simulate high-end workloads. These stability tests aim to catch any immediate causes for memory or CPU errors.
For manual overclocks, based on the information gathered from previous testing, starts off at a nominal voltage and CPU multiplier, and the multiplier is increased until the stability tests are failed. The CPU voltage is increased gradually until the stability tests are passed, and the process repeated until the motherboard reduces the multiplier automatically (due to safety protocol) or the CPU temperature reaches a stupidly high level (100ºC+). Our test bed is not in a case, which should push overclocks higher with fresher (cooler) air.
Automatic Overclock:
For our automatic overclocks, we skipped straight into the EasyTune software, under the Smart Quick Boost Tab:
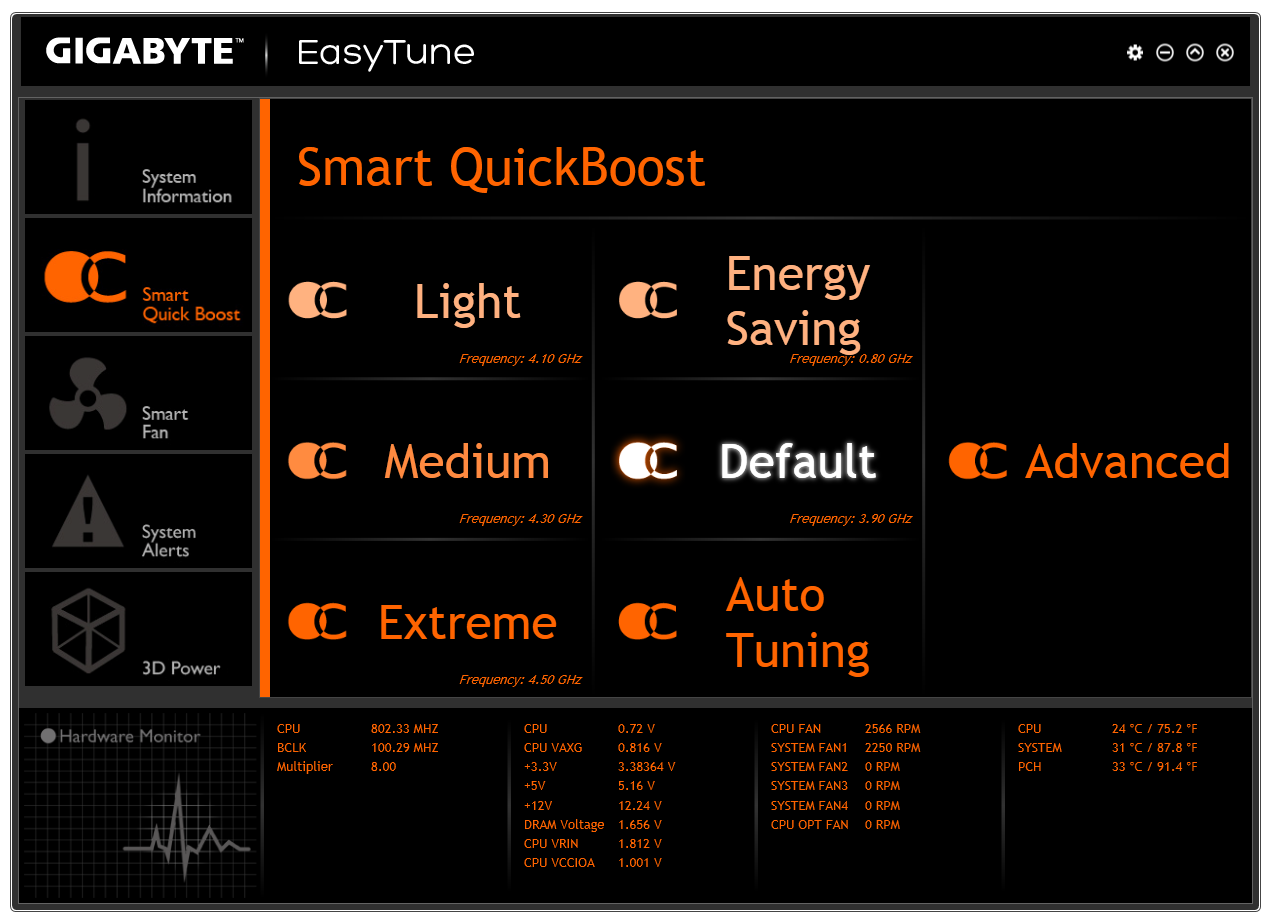
We get five main overclock options which gave the following results:
The ‘Light’ setting rebooted the system to 4.1 GHz (41x100), which under load gave 1.064 volts on the CPU and a PovRay score of 1706. Unfortunately this was not enough voltage for our sample to sustain a 5 minute OCCT stress test.
The ‘Medium’ setting rebooted the system to 4.3 GHz (43x100), which under load gave 1.264 volts on the CPU and a PovRay score of 1785.38. The peak temperature reported in our OCCT stress test was 77ºC.
The ‘Extreme’ setting gave 4.5 GHz (45x100) at the same load voltage as Medium, 1.264 volts. This resulted in a PovRay score of 1867.32 and an OCCT peak temperature of 78ºC.
The ‘Energy Saving’ mode causes the CPU to idle speeds at any loading, meaning 800 MHz (8x200. This gave a peak voltage of 0.883 volts on the CPU and a PovRay score of 317.30. The OCCT stress test gave a peak temperature of 38ºC.
The final setting, ‘Auto Tuning’, requires flash to be installed. When it gets going, the program stress tests the system for stability, raising the multiplier. When the system had finished, we had a graduated turbo result, giving 5.0 GHz in single core mode and 4.8 GHz in multithreaded mode, with the BIOS set to 1.545 volts. This is quite an alarming voltage for an i7-4770K, as shown in our stress tests where the CPU would rise above 91ºC and the system would reduce the clock speed to compensate. We got a PovRay score of 1779.53 (~4.35 GHz average) and the OCCT stress test failed with a BSOD.
Manual Overclock:
For our manual overclocking, while the OC Touch buttons are available, in order to get a rock stable 24/7 overclock we headed to the BIOS. Due to my eyesight not enjoying the variable contrast of HD mode, I usually skip into the classic mode for the overclocks:
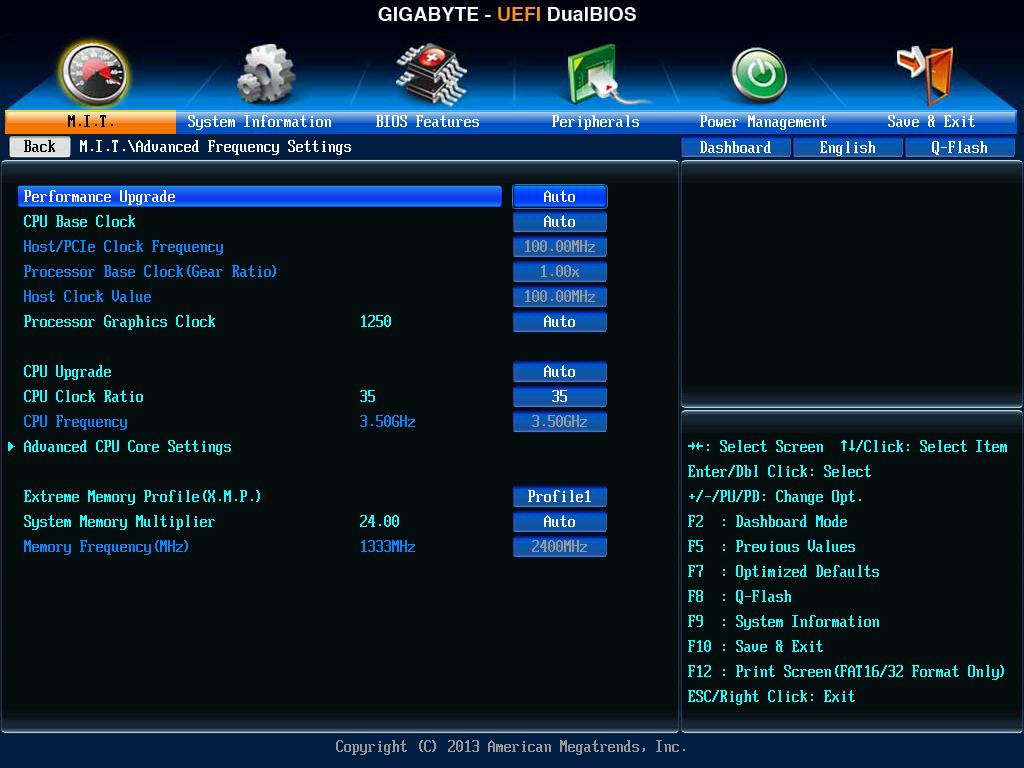
As with other Z87 overclock testing, we start with 40x100 on the CPU at 1.000 volts. If this is unstable (PovRay + 5 min OCCT), the voltage is raised by +0.025. If it is stable, we make a note of the voltage/multiplier combination and raise the multiplier by one. Ultimately the limit is how comfortable the temperatures are. Here are the results:
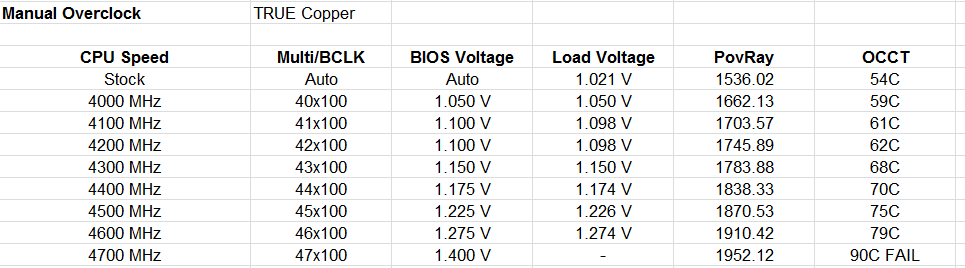
Ultimately our main limitation is with our CPU sample. The *good* i7-4770K CPUs that end up in highly overclocked prebuilt systems can pass 3DMark Vantage at 4.8 GHz with 1.25 volts, which apparently indicates a 1 in 25 CPU. Our CPU seems to top out at 4.6 GHz, with anything higher than that needing an insane voltage to keep stable. We were able to boot into Windows at 5.0 GHz, although this was not stable under load.


23 Comments
View All Comments
DonnaCabel16 - Monday, October 14, 2013 - link
First time i trusted an online job add and managed to make 90$ in 5 hours... ℰxit35.comsearocker - Thursday, October 17, 2013 - link
Hi Guys, this mainboard has Stepping C2? thxxElphiGoji - Thursday, November 21, 2013 - link
I think this one of the best mother board...